Bei der Aktualisierung auf Version 2.22.0 scheitert das Bauen meines Git-Paketes:
12345678910111213141516171819202122
$ cd git-2.21.0
$ uupdate -u ../git-2.22.0.tar.xz
uupdate: New Release will be 1:2.22.0-0ubuntu1.
uupdate: Untarring the new sourcecode archive ../git-2.22.0.tar.xz
uupdate: Unpacking the debian/ directory from version 1:2.21.0-0dp07~xenial1 worked fine.
uupdate: Remember: Your current directory is the OLD sourcearchive!
uupdate: Do a "cd ../git-2.22.0" to see the new package
$ cd ../git-2.22.0
$ dpkg-buildpackage
...
dpkg-source: info: using source format '3.0 (quilt)'
dpkg-source: info: building git using existing ./git_2.22.0.orig.tar.xz
patching file Documentation/Makefile
Hunk #1 succeeded at 436 (offset 46 lines).
Hunk #2 FAILED at 401.
1 out of 2 hunks FAILED
patching file Documentation/technical/api-index.sh
dpkg-source: info: the patch has fuzz which is not allowed, or is malformed
dpkg-source: info: if patch 'Normalize-generated-asciidoc-timestamps-with-SOURCE_D.diff' is correctly applied by quilt, use 'quilt refresh' to update it
dpkg-source: error: LC_ALL=C patch -t -F 0 -N -p1 -u -V never -E -b -B .pc/Normalize-generated-asciidoc-timestamps-with-SOURCE_D.diff/ --reject-file=- < git-2.22.0.orig.RiMq1I/debian/patches/Normalize-generated-asciidoc-timestamps-with-SOURCE_D.diff gave error exit status 1
dpkg-buildpackage: error: dpkg-source -b git-2.22.0 gave error exit status 2
$
Nachfolgend beschreibe ich, wie ich das Problem korrigiere.
Sichtung der Fehlermeldung
Die Fehlermeldung sieht grob so aus:
1
dpkg-source: info: the patch has fuzz which is not allowed, or is malformed
Ich gehe davon aus, dass der Patch möglicherweise funktionieren kann, sofern man ihn “unscharf” anwendet.
Das verbietet QUILT üblicherweise!
Quilt initialisieren
1
$ export QUILT_PATCHES=debian/patches
Patch unscharf anwenden
12345678
$ quilt push
Applying patch debian/patches/Normalize-generated-asciidoc-timestamps-with-SOURCE_D.diff
patching file Documentation/Makefile
Hunk #1 succeeded at 436 (offset 46 lines).
Hunk #2 succeeded at 447 with fuzz 2 (offset 46 lines).
patching file Documentation/technical/api-index.sh

Now at patch debian/patches/Normalize-generated-asciidoc-timestamps-with-SOURCE_D.diff
Bei Bamboo kann man eine oder mehrere Passwort-Variable
(=Variable, die im Namen “password” enthält) setzen.
Im Build-Log von Bamboo wird der Wert dieser Variablen dann maskiert,
Werte von “normalen” Variablen sieht man:
12345678
...
command   23-May-2019 17:15:23    Substituting variable: ${bamboo.BUILD_USER} with my.build.user
command   23-May-2019 17:15:23    Substituting password variable: ${bamboo.BUILD_PASSWORD}
...
command   23-May-2019 17:15:23    Beginning to execute external process for build....
running command line:
../gradlew -Puser=my.build.user -Ppassword=********
...
Wenn man in einem Build-Skript den Wert einfach ausgibt,
so erscheint dies zwar im Log, leider ist der Wert aber auch dort
maskiert. Das soll vermutlich verhindern, dass man einfach an
den Wert herankommt.
Manchmal braucht man ihn aber doch, bspw. wenn die ursprüngliche
Bamboo-Job-Einrichtung nicht vernünftig dokumentiert und der
“Einrichter” nicht mehr erreichbar ist.
Viele unserer Kunden setzen DB2 als Datenbank ein.
DB2 kann JDBC-Verbindungen mittels TLS verschlüsseln.
Leider treten dabei gelegentlich Probleme auf, die
“Anwender” melden dann idR. Zertifikatsprobleme
unabhängig vom tatsächlichen Problem.
Ausgangslage
Zugriff auf die DB2 klappt für alle Programme, die Java8 oder neuer
verwenden. Bei Java7 gibt es eine “SSLHandshakeException”:
123456
javax.net.ssl.SSLHandshakeException: Received fatal alert: handshake_failure
  at sun.security.ssl.Alerts.getSSLException(Alerts.java:192)
  at sun.security.ssl.Alerts.getSSLException(Alerts.java:154)
  at sun.security.ssl.SSLSocketImpl.recvAlert(SSLSocketImpl.java:1991)
  at sun.security.ssl.SSLSocketImpl.readRecord(SSLSocketImpl.java:1098)
...
Oberflächlich ist klar:
Entweder ist das DB2-Zertifikat abgelaufen
… oder von einer merkwürdigen CA ausgestellt
… oder die CA nicht im “cacerts” eingetragen (das ist “was spezielles” für
diesen Kunden, er ändert diese gerne)
… scheint nicht zu klappen. Liegt an der veralteten Version von OPENSSL:
12
$ openssl version
OpenSSL 0.9.8j-fips 07 Jan 2009
Neuer Versuch mit neuerer Version:
12345678910111213141516171819202122232425
$ openssl version
OpenSSL 1.0.1g 7 Apr 2014
$ openssl s_client -connect db2.internal.biz:62000
CONNECTED(00000003)
depth=2 DC = biz, DC = ios, DC = iosPKI, CN = IOS-CA-ROOT-42
verify return:1
depth=1 DC = biz, DC = ios, DC = iosPKI, CN = IOS-CA-PROC-43
verify return:1
depth=0 C = DE, O = IOS GmbH, OU = DB2ADM, CN = db2.internal.biz, L = Stuttgart, ST = Baden-Wuerttemberg
...
$ openssl s_client -connect db2.internal.biz:62000|openssl x509 -text
Certificate:
    Data:
        Version: 3 (0x2)
        Serial Number: 3899571 (0x3b80b3)
        Signature Algorithm: sha256WithRSAEncryption
        Issuer: DC=biz, DC=ios, DC=iosPKI, CN=IOS-CA-PROC-43
        Validity
            Not Before: Mar 22 12:17:19 2019 GMT
            Not After : Mar 22 00:00:00 2023 GMT
        Subject: C=DE, O=IOS GmbH, OU=DB2ADM, CN=db2.internal.biz, L=Stuttgart, ST=Baden-Wuerttemberg
...
            X509v3 Subject Alternative Name:
                DNS:gateway001.internal.biz, DNS:gateway002.internal.biz
...
Man sieht:
* das Zertifikat ist gültig
* … und von der richtigen CA ausgestellt
* … und auf die richtigen Namen ausgestellt
Am Zertifikat gibt es nichts zu bemängeln!
Abstimmung mit dem DB2-Team – Ciphers
Das DB2-Team hat die BSI-Empfehlung zu TLS
umgesetzt und die darin enthaltenen Ciphers als zulässig konfiguriert.
Also Quercheck mit unserer Java7-Version: Gibt es da Überlappungen? Unterstützt
unsere Java7-Version einen der hinterlegten Ciphers? Die unterstützten Ciphers kann man sich leicht anzeigen lassen mit Ciphers.java:
Das “Sternchen” bedeutet hier, dass es sich um einen “Default Cipher” handelt.
Es gibt beispielsweise den Cipher TLS_ECDHE_RSA_WITH_AES_128_CBC_SHA256, der
in der Liste der Default Ciphers enthalten ist und auch in der BSI-Liste.
“Eigentlich müßte es funktionieren”.
Analyse mit SSLPoke
Mit SSLPoke
kann man weitere Erkenntnisse sammeln:
1234567891011121314
$ javac SSLPoke.java
$ /java8/bin/java SSLPoke db2.internal.biz 62000
Successfully connected
$ java SSLPoke db2.internal.biz 62000
javax.net.ssl.SSLHandshakeException: Received fatal alert: handshake_failure
  at sun.security.ssl.Alerts.getSSLException(Alerts.java:192)
  at sun.security.ssl.Alerts.getSSLException(Alerts.java:154)
  at sun.security.ssl.SSLSocketImpl.recvAlert(SSLSocketImpl.java:1991)
  at sun.security.ssl.SSLSocketImpl.readRecord(SSLSocketImpl.java:1098)
  at sun.security.ssl.SSLSocketImpl.performInitialHandshake(SSLSocketImpl.java:1344)
  at sun.security.ssl.SSLSocketImpl.writeRecord(SSLSocketImpl.java:721)
  at sun.security.ssl.AppOutputStream.write(AppOutputStream.java:122)
  at sun.security.ssl.AppOutputStream.write(AppOutputStream.java:136)
  at SSLPoke.main(SSLPoke.java:31)
SSLPoke verhält sich ähnlich zu den Java-Programmen: Mit Java8 funktioniert alles,
mit Java7 gibt’s Probleme!
Also: SSL-Debugging aktivieren und nochmal probieren:
Hier beschreibe ich, wie ich LXD/LXC auf KDE Neon 18.04
in Betrieb nehme. Die ganze Aktion dauert grob 1 Stunde,
wenn man halbwegs weiß, was man zu erledigen hat.
Aktualisieren
1
sudo pkcon update
LXD installieren
1
sudo snap install lxd
Plattenbereich für LXC anlegen
123456789101112
$ sudo vgdisplay
  --- Volume group ---
  VG Name               neon-vg
...
  VG Size               <465,04 GiB
  PE Size               4,00 MiB
  Total PE              119050
  Alloc PE / Size       61684 / 240,95 GiB
  Free  PE / Size       57366 / <224,09 GiB
  VG UUID               CZfxss-UeDu-s1pZ-dwb6-Iffa-pOuO-84otnm
$ sudo lvcreate -n lxclv -L 50G neon-vg
 Logical volume "lxclv" created.
$ sudo lxd init
Would you like to use LXD clustering? (yes/no) [default=no]:
Do you want to configure a new storage pool? (yes/no) [default=yes]:
Name of the new storage pool [default=default]:
Name of the storage backend to use (btrfs, ceph, dir, lvm, zfs) [default=zfs]: btrfs
Create a new BTRFS pool? (yes/no) [default=yes]: yes
Would you like to use an existing block device? (yes/no) [default=no]: yes
Path to the existing block device: /dev/mapper/neon--vg-lxclv
Would you like to connect to a MAAS server? (yes/no) [default=no]: no
Would you like to create a new local network bridge? (yes/no) [default=yes]:
What should the new bridge be called? [default=lxdbr0]:
What IPv4 address should be used? (CIDR subnet notation, “auto” or “none”) [default=auto]:
What IPv6 address should be used? (CIDR subnet notation, “auto” or “none”) [default=auto]:
Would you like LXD to be available over the network? (yes/no) [default=no]: no
Would you like stale cached images to be updated automatically? (yes/no) [default=yes]
Would you like a YAML "lxd init" preseed to be printed? (yes/no) [default=no]: yes
config: {}
networks: []
storage_pools:
- config:
    source: /dev/mapper/neon--vg-lxclv
  description: ""
  name: default
  driver: btrfs
profiles:
- config: {}
  description: ""
  devices:
    eth0:
      name: eth0
      nictype: bridged
      parent: lxdbr0
      type: nic
    root:
      path: /
      pool: default
      type: disk
  name: default
cluster: null
In einem meiner LXC-Container erscheint beim Stoppen und Starten
vom Apache HTTPD plötzlich die Fehlermeldung “Failed to allocate directory watch: Too many open files”:
1234
container# service apache2 stop
Failed to allocate directory watch: Too many open files
container# service apache2 start
Failed to allocate directory watch: Too many open files
uli@ulivaio:~/git/dp-octopress/source/_posts$ sudo systemctl status docker
● docker.service - Docker Application Container Engine
   Loaded: loaded (/lib/systemd/system/docker.service; disabled; vendor preset: enabled)
   Active: active (running) since Wed 2019-05-15 10:30:54 CEST; 31s ago
     Docs: https://docs.docker.com
 Main PID: 7967 (dockerd)
    Tasks: 34
   CGroup: /system.slice/docker.service
           ├─7967 /usr/bin/dockerd -H fd://
           └─8007 docker-containerd --config /var/run/docker/containerd/containerd.toml --log-level info

Mai 15 10:30:53 ulivaio dockerd[7967]: time="2019-05-15T10:30:53.646065184+02:00" level=warning msg="Your kernel does not support swap memory limit"
Mai 15 10:30:53 ulivaio dockerd[7967]: time="2019-05-15T10:30:53.646243714+02:00" level=warning msg="Your kernel does not support cgroup rt period"
Mai 15 10:30:53 ulivaio dockerd[7967]: time="2019-05-15T10:30:53.646288000+02:00" level=warning msg="Your kernel does not support cgroup rt runtime"
Mai 15 10:30:53 ulivaio dockerd[7967]: time="2019-05-15T10:30:53.647513602+02:00" level=info msg="Loading containers: start."
Mai 15 10:30:53 ulivaio dockerd[7967]: time="2019-05-15T10:30:53.930711295+02:00" level=info msg="Default bridge (docker0) is assigned with an IP address 172.17.0.0/16. Daemon option --bip
Mai 15 10:30:54 ulivaio dockerd[7967]: time="2019-05-15T10:30:54.028985746+02:00" level=info msg="Loading containers: done."
Mai 15 10:30:54 ulivaio dockerd[7967]: time="2019-05-15T10:30:54.118204664+02:00" level=info msg="Docker daemon" commit=6247962 graphdriver(s)=overlay2 version=18.09.2
Mai 15 10:30:54 ulivaio dockerd[7967]: time="2019-05-15T10:30:54.118469534+02:00" level=info msg="Daemon has completed initialization"
Mai 15 10:30:54 ulivaio dockerd[7967]: time="2019-05-15T10:30:54.153116770+02:00" level=info msg="API listen on /var/run/docker.sock"
Mai 15 10:30:54 ulivaio systemd[1]: Started Docker Application Container Engine.
Docker ohne SUDO
1234
sudo usermod -aG docker ${USER}
# Abmelden und wieder anmelden
# Nachkontrolle - muß "docker" ausgeben
id ${USER}|grep -o docker
Erster Docker-Container
123456789101112131415161718192021222324252627
uli$ docker run hello-world
Unable to find image 'hello-world:latest' locally
latest: Pulling from library/hello-world
1b930d010525: Pull complete
Digest: sha256:5f179596a7335398b805f036f7e8561b6f0e32cd30a32f5e19d17a3cda6cc33d
Status: Downloaded newer image for hello-world:latest

Hello from Docker!
This message shows that your installation appears to be working correctly.

To generate this message, Docker took the following steps:
 1. The Docker client contacted the Docker daemon.
 2. The Docker daemon pulled the "hello-world" image from the Docker Hub.
    (amd64)
 3. The Docker daemon created a new container from that image which runs the
    executable that produces the output you are currently reading.
 4. The Docker daemon streamed that output to the Docker client, which sent it
    to your terminal.

To try something more ambitious, you can run an Ubuntu container with:
 $ docker run -it ubuntu bash

Share images, automate workflows, and more with a free Docker ID:
 https://hub.docker.com/

For more examples and ideas, visit:
 https://docs.docker.com/get-started/
Manchmal beobachte ich, dass die Zeitzone in meinen LXC-Containern
nicht stimmt. Die Uhrzeit geht dann scheinbar eine Stunde oder zwei Stunden
vor, je nachdem, ob Normalzeit oder Sommerzeit herrscht.
Korrigieren mit dpkg-reconfigure
1
root# dpkg-reconfigure tzdata
Es erscheint eine Abfolge von Text-Masken:
Configuring tzdata
Geographic area: Europe – OK
Time zone: Berlin – OK
Korrigieren mit timedatctl
12
root# timedatectl set-timezone Europe/Berlin
Failed to create bus connection: No such file or directory
… funktioniert leider manchmal nicht!
Ich habe noch nicht herausgefunden, dann das
nicht funktioniert!
Heute ist mir mehr oder weniger zufällig aufgefallen,
dass meine Ubuntu-18.04-Container ohne Benutzer-Zuordnung laufen.
Der Benutzer “root” innerhalb des Containers entspricht also
dem Benutzer “root” außerhalb. Damit fehlt aus meiner Sicht
eine wichtige Hürde für Ausbrechmöglichkeiten!
Hier beschreibe ich, wie ich das Problem korrigiere
Sichtung der LXC-Container mit Ubuntu-16.04
Die LXC-Container, die unter Ubuntu-16.04 laufen,
haben diese Zuordnungen für Benutzer und Gruppen:
lxc.id_map = u 0 165536 65536
lxc.id_map = g 0 165536 65536
Das bedeutet, dass der Benutzer “root” innerhalb des Containers
dem Benutzer “165536” außerhalb des Containers zugeordnet ist.
Gleiches gilt für die Gruppe. Dieser Benutzer kann außerhalb
des Containers quasi keinerlei Aktionen durchführen!
Anpassung des Basiscontainers
Bereiche wählen
User: 100000 – 165535 (Länge: 65536)
Group: 100000 – 165535 (Länge: 65536)
/etc/subuid und /etc/subgid erweitern auf dem LXC-Host (auch für “root”, mehrere Zeilen pro UID sind OK)
Für einen Kundenauftrag bestand für mich die
Notwendigkeit, eine VM mit SLES10 von VMwarePlayer
zu VirtualBox zu migrieren.
VM erstellen
VirtualBox starten
Oracle VM VirtualBox Manager – Neu
Virtuelle Maschine erzeugen
Name: SLES10
Ordner: …
Typ: Linux
Version: openSUSE (64-bit)
Speichergröße: 2048 MB
Vorhandene Festplatte verwenden: VMDK-Datei vom VMwarePlayer
Erzeugen
Erste Starts
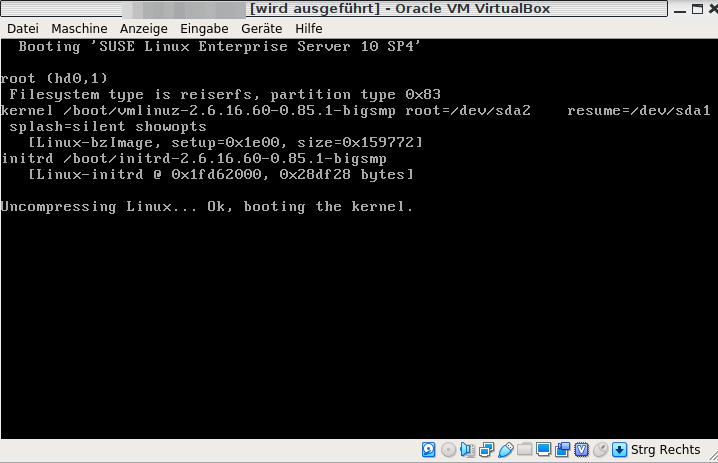
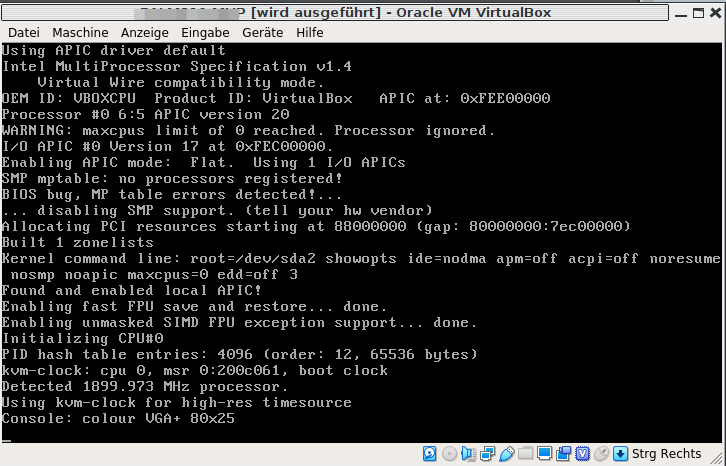
Leider klappt der Start der frisch angelegten
VM nicht. Sowohl beim “normalen” Startvorgang, als auch
mein “failsafe”n Startvorgang bleibt die VM während
des Starts hängen. Details sind nachfolgenden Bildschirmfotos
zu entnehmen!
Normal
Failsafe
Korrektur
VirtualBox starten
Oracle VM VirtualBox Manager – VM auswählen (links in der Liste) – System
Soll: “keine”, “minimal”, “Hyper-V” oder “legacy”
(diese Werte funktionieren alle)
Zweiter Start
Nun startet die VM (fast) wie üblich, man kann sich im Textmodus
anmelden. Probleme gibt es lediglich bei der grafischen Anmeldung
(… die brauche ich aber nicht).
# Ermitteln: Welche /dev/sdX-Datei gehört zum USB-Stick?
# -> Bei mir: /dev/sdb [WICHTIG! NICHT "RATEN"!]
dd if=neon-user-...iso of=/dev/sdb
Installation durchführen
Von USB starten
Bei UEFI-PCs: “Textoberfläche” muß sichtbar sein für das Boot-Menü!
Wenn’s grafisch aussieht, dann startet der USB-Stick im BIOS-Modus,
das sorgt für Probleme!
Installation – Komplette Platte mit verschlüsseltem LVM